Quick start guide for data acquisition
The following shows the basic flow of data acquisition. For more detailed information, please see the other pages below.
MiCAM05 acquisition setting
MiCAM03 acquisition setting
Data acquisition page
Below shows flow of general procedures for high speed fluorescence imaging using a biological sample stained with fluorescent dye.
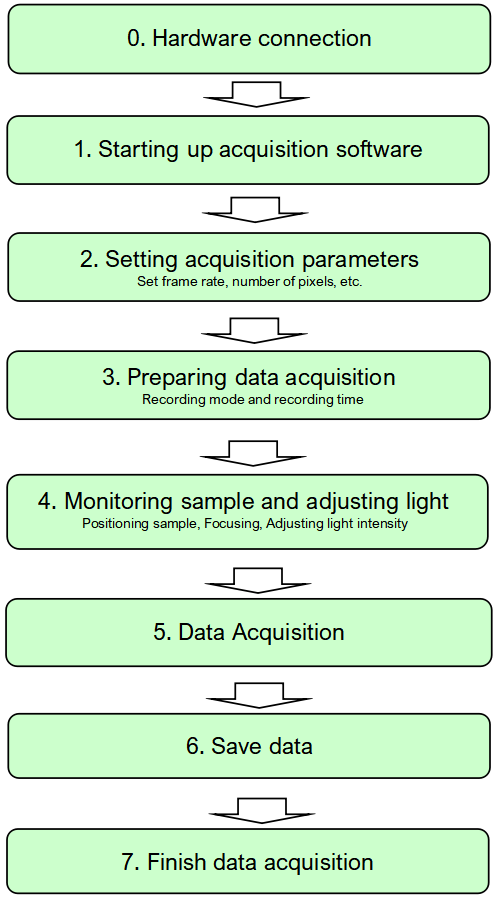
0. Hardware connection
0-1. MiCAM03 processor (front)
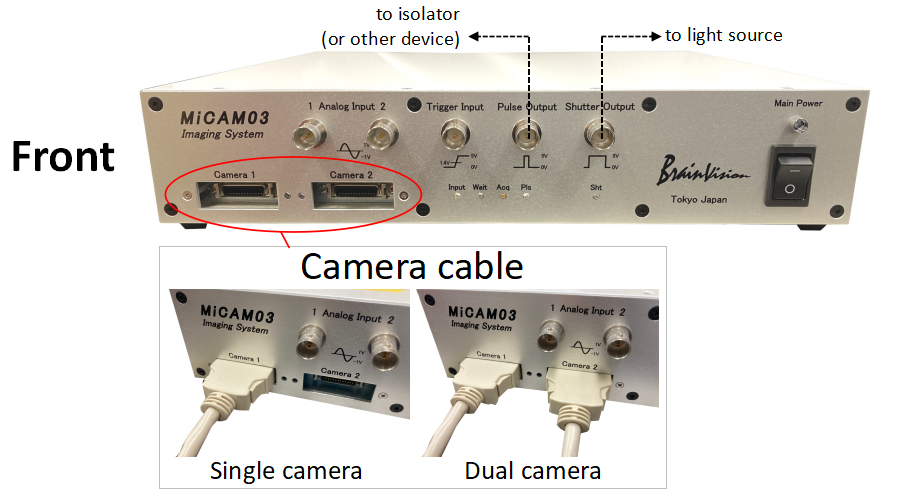
- Connect the camera cable(s) to the camera port(s). If you have a single camera, connect it to "Camera1".
- Connect a BNC cable connecting a light source such as LEX3 or LEX9 and MiCAM to "Shutter output".
- If you want to use stimulation pulse output, connect a BNC cable for connecting an isolator and MiCAM to "Pulse output".
0-2. MiCAM03 processor (rear)
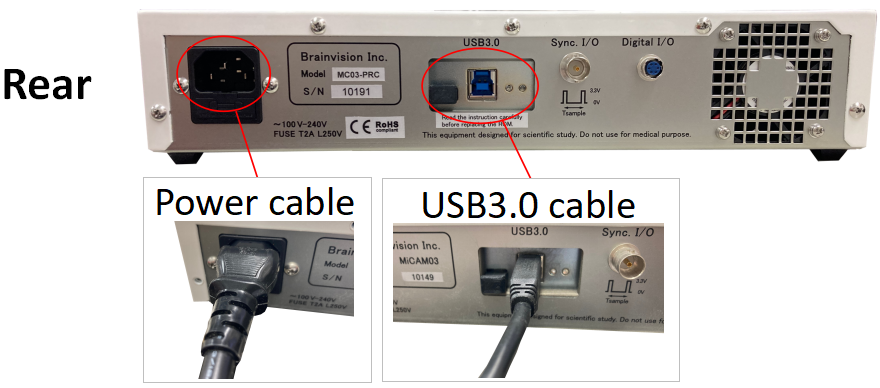
- Connect the power cable to the power socket.
- Connect the USB3.0 cable to the USB port. Connect the other end of the USB 3.0 cable to a USB 3.0 port on your PC.
0-3. N256 camera head
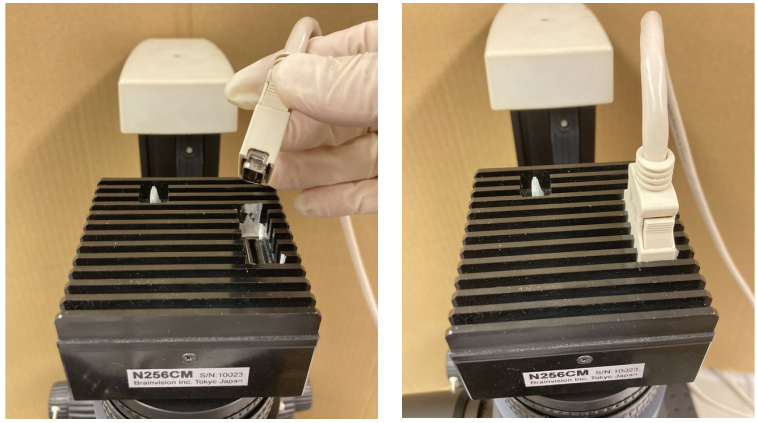
Connect the camera cable to the connector of the N256 camera head. Insert the cable into the connector until you hear a "click".
0-4. PC
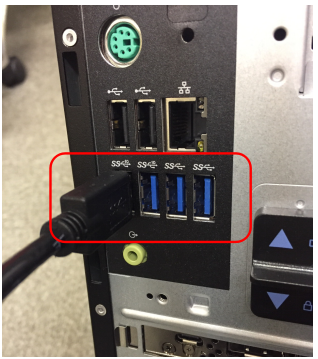
Connect the other end of the USB 3.0 cable connected to the back of the processor to a USB 3.0 port on your PC.
Usually, you can use either the front or rear port, but in most cases, the rear port works better.
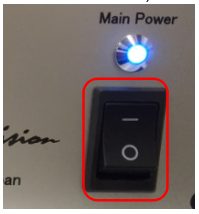
1. Starting up acquisition software
Turn on the power switch on the front of the processor.
BV Workbench can be activated even when MiCAM05/MiCAM03 is not turned on. In this case, BV Workbench uses an offline mode in which saved data can be loaded, data analysis function can be used.
Double-click the BV Workbench icon on the desktop (or registered in the start menu) to start BV Workbench.

BV Workbench starts.

The main window opens.
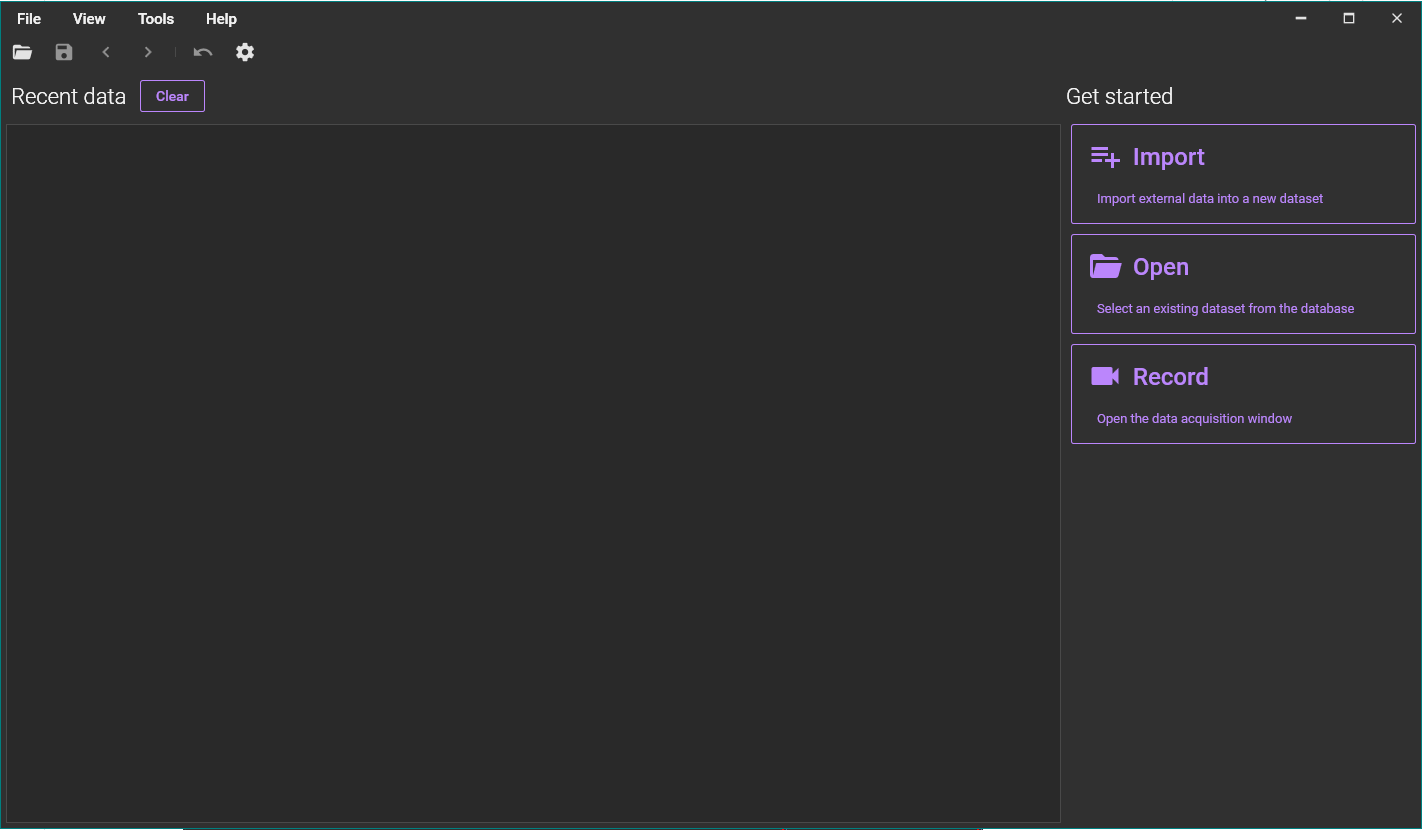
There are the following two ways to open the acquisition window, (1) select [Acquisition] from [View] menu or (2) click [Record] on the main window.
(1) Select [Acquisition] from [View] menu.

(2) Or click [Record] on the main window.
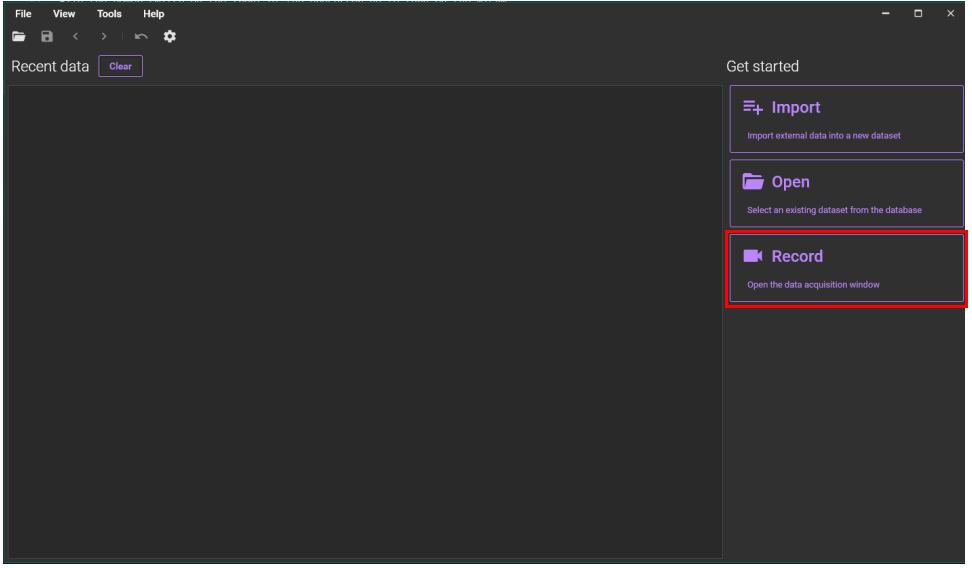
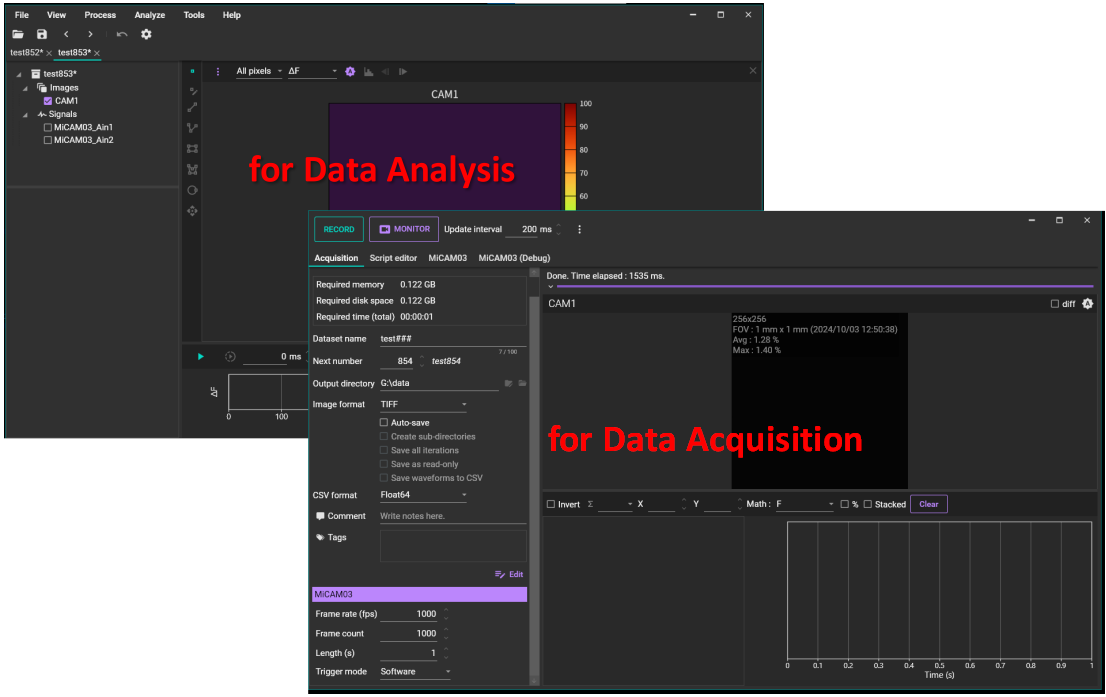
The following data acquisition window appears.
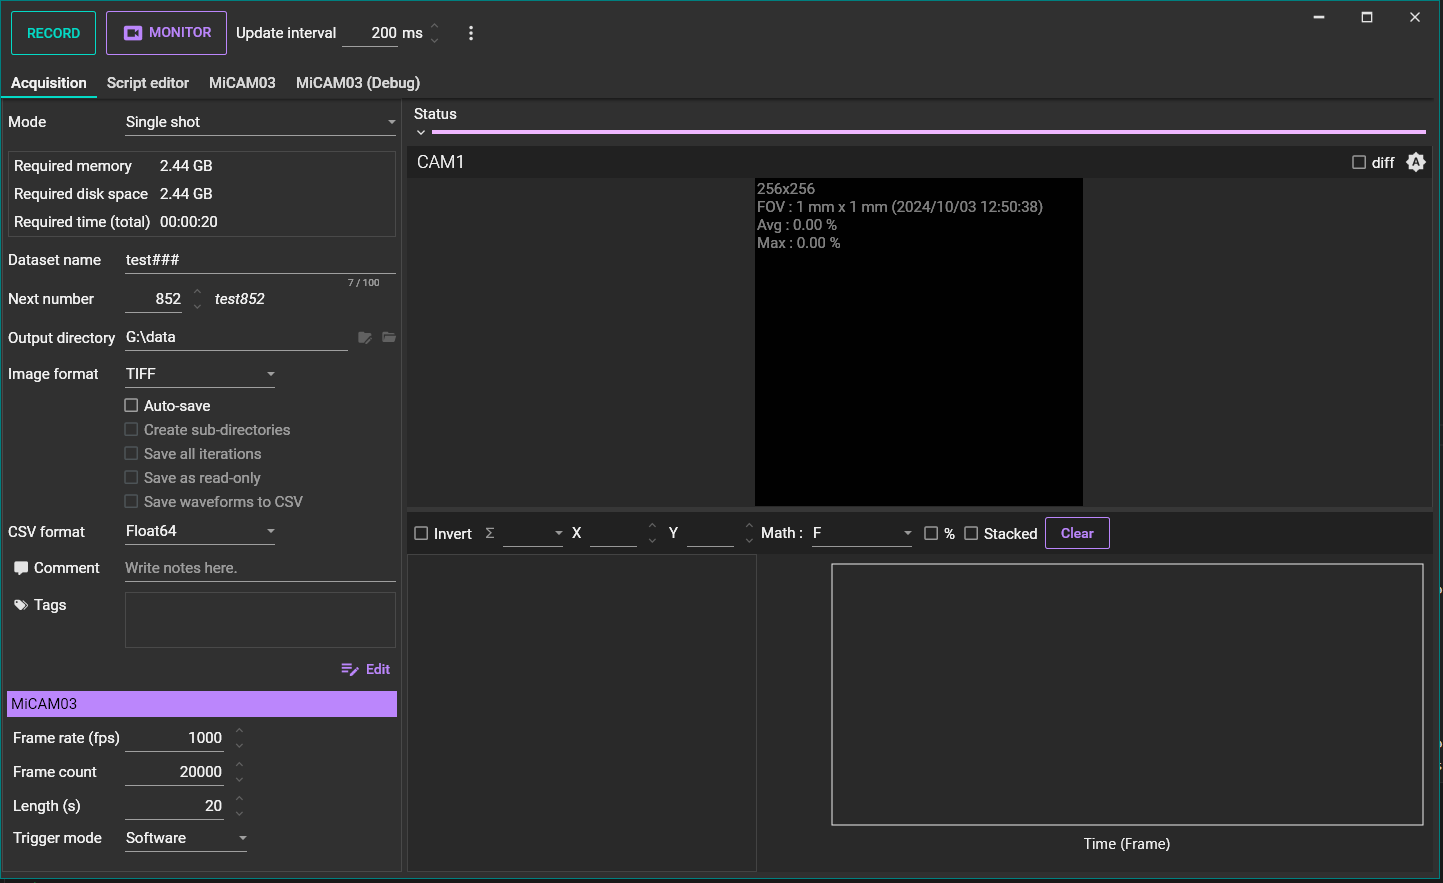
The window for data acquisition and the window for data analysis are displayed separately.
2. Setting acquisition parameters
Set frame rate, number of pixels, etc.
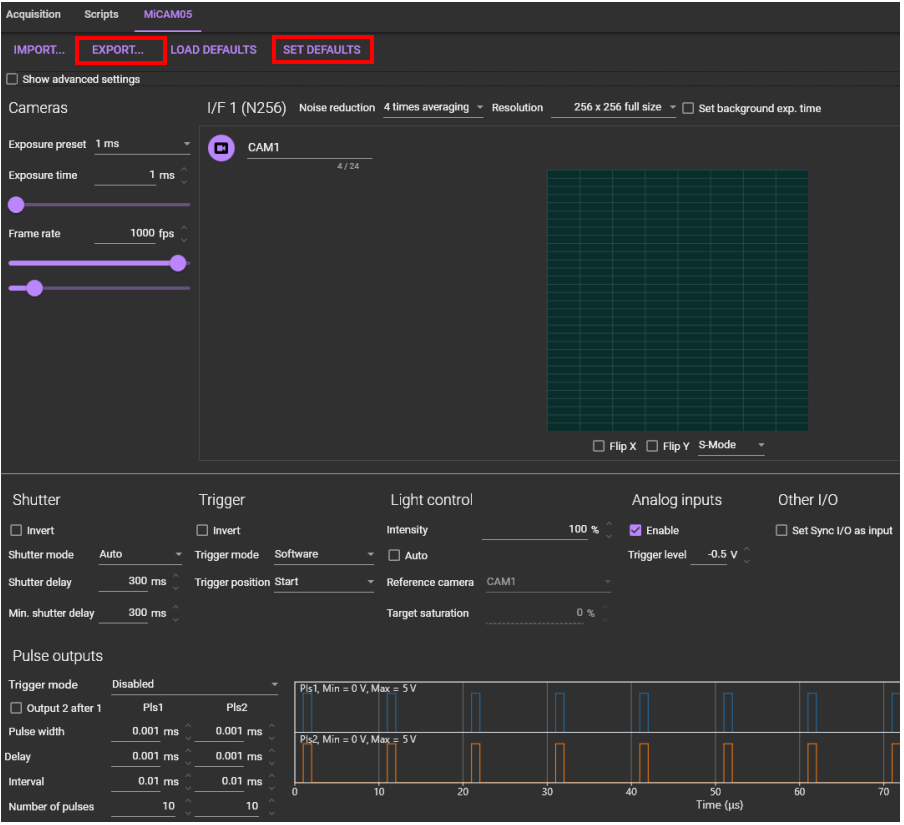
Click "MiCAM03 (or MiCAM05)" tab.

Standard setting is as below. Settings can be saved in a file with [EXPORT...], or it can be set as default with [SET DEFAULTS].
In case that multiple people use the same software, it is convenient to save to multiple files from [EXPORT...].
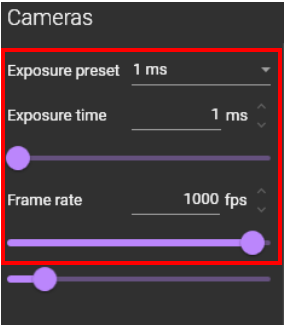
2-1. Frame rate and Exposure time
Set image capture speed. [Exposure preset] and [Exposure time] indicate exposure time per frame, and [Frame rate] indicates number of captured frames per second.
For example, when “Exposure preset=2ms”, frame rate is 1000/2=500fps (frame per second or Hz).
It is necessary to change the exposure time setting according to biological sample and experimental conditions. After staining a sample with fluorescent dye, set 2.0msec or 3.0msec at first and try the test trial. After that, change to 1.0msec or less as necessary.
Exposure times less than 1 ms are only available with purchase of a dedicated software license.
2-2. Noise reduction
This mode reduces noise when reading signals from the image sensor. In general, use average 4x, but this reduces the minimum available exposure time when recording with exposure times less than 1 ms.

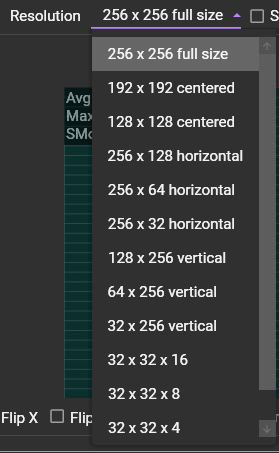
2-3. Spatial resolution (number of pixels)
Set the number of pixels. By default, you can specify 256x256 pixels or 128x128 pixels.
Optional software license ("Multiple ROI Readout for Higher Frame Rates") allows for more pixel settings
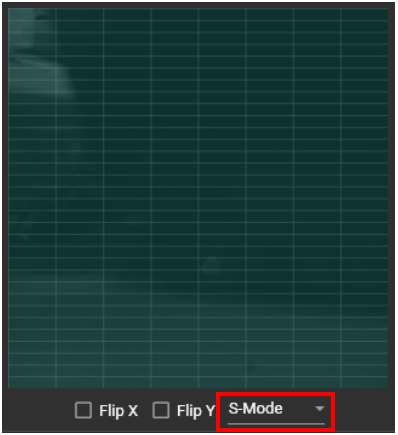
2-4. S-Mode/D-Mode
S-Mode/D-Mode setting is for changing size of full well capacity.
It is necessary to change this setting according to biological sample. In general, D-Mode is suitable for high light condition and S-Mode is suitable for medium to low light condition.
| S-Mode | full well capacity 600,000 electrons |
| D-Mode | full well capacity 3,000,000 electrons |
The main noise in optical imaging is noise called “photon shot noise”. This occurs for the square root of photon incident on pixel.
As the amount of photons increases, the noise decreases relatively and the S/N ratio improves. D-Mode may be good under condition that the fluorescent light intensity is sufficient, and S-Mode may be better under the other conditions.
2-5. Shutter delay
Set "shutter delay time". The value you set will vary depending on a light source, but in most cases, 300-500msec will be sufficient.
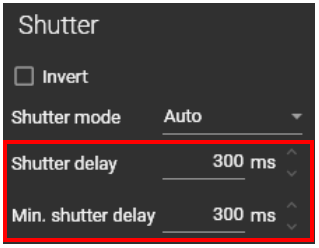
"Shutter delay time" is time from when [RECORD] button is clicked until actual acquisition starts.
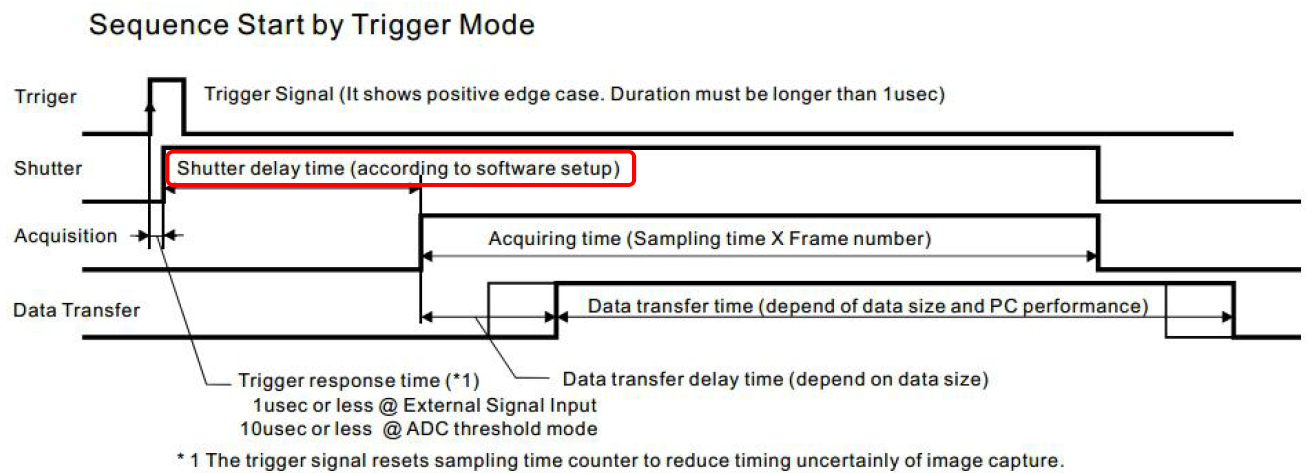
Under normal acquisition conditions, electrical signals, which opens shutter (or light up in case of LED light source), are immediately output from “Shutter output” terminal by clicking [RECORD] button. It is necessary to start actual acquisition as soon as shutter is fully opened (in case of LED light source, after reaching the set intensity) and set time required for it.
LED light source made by Brainvision (model: LEX2, LEX3, LEX9) requires about 300msec until intensity is reached to set intensity from start of irradiation. For halogen light source with built-in shutter made by Brainvision (model: HL-151), it takes several tens msec (depending on setting of shutter speed) to open an electromagnetic shutter.
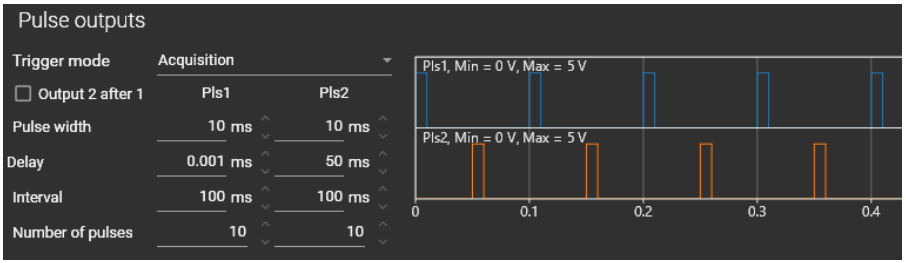
2-6. Stimulus pulse outputs
To output stimulation pulses from "Pulse output" port of MiCAM05/MiCAM03 in synchronization with image acquisition, set pulse pattern in [Pulse outputs] area. The standard setting is as below.
2-7. Trigger mode
This is the setting for whether MiCAM is "Master" device or "Slave" device.
We recommend you to select "Trigger mode=Software" at first. If you want to trigger MiCAM from an external device, please select "Trigger mode=External".

| Trigger mode | Description |
|---|---|
| Software | Software trigger. Acquisition begins when the [RECORD] button is pressed. |
| Exernal | External trigger. When you press the [RECORD] button, it is in “Waiting” state. Acquisition starts when external signal (TTL) is inputted to the [Trigger input] terminal of the processor. |
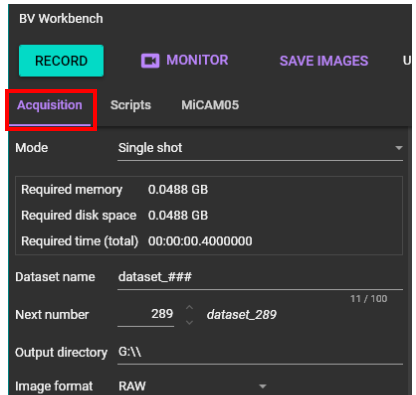
3. Preparing data acquisition
Specify recording mode and recording time to prepare for data acquisition.
Click [Acquisition] tab.
3-1. Recording mode
Select the recording mode from the following list box.
![]()
The recording modes are as follow.
We recommend using [Single shot] for normal use, and [Single shot (direct to disk)]" if you want to record for a long time.
| (1-1) Single shot | Acquire once. Acquired data is temporarily stored in RAM of PC. It can be saved to PC from [Save] button. Since PC’s RAM is used as buffer memory for acquired data, number of recordable frames is smaller than [Single shot (direct to disk)]. |
|---|---|
| (1-2) Single shot (direct to disk) | Acquire once. Acquired data is automatically saved to drive of PC concurrently with data acquisition. Since acquired data is written directly to SSD (Solid State Disk) or HDD, it is possible to record for a longer time than [Single shot] mode (under conditions with a large amount of data per unit time, such as higher resolutions, faster frame rate, multi camera, the buffer memory inside the MiCAM05/MiCAM03 becomes fill easily and there is an upper limit on the number of recordable frames). |
3-2. Recording time
If you select [Single shot], the following will be displayed. Enter total recording time in “Length (s)”, or total number of frames in “Frame count”.
Total recording time (Length(s)) = Total number of frames (Frame count) / Frame rate (fps)

4. Monitoring sample and adjusting light intensity
While monitoring a biological sample, adjust focus, position, and adjust light intensity of light.
4-1. Start monitoring
When  button is clicked, sampling monitor is performed intermittently with exposure time specified in "2-1. Frate rate and Exposure time".
While looking at monitor image, adjust the position of the sample, adjust the focus and adjust the light intensity of the excitation light source.
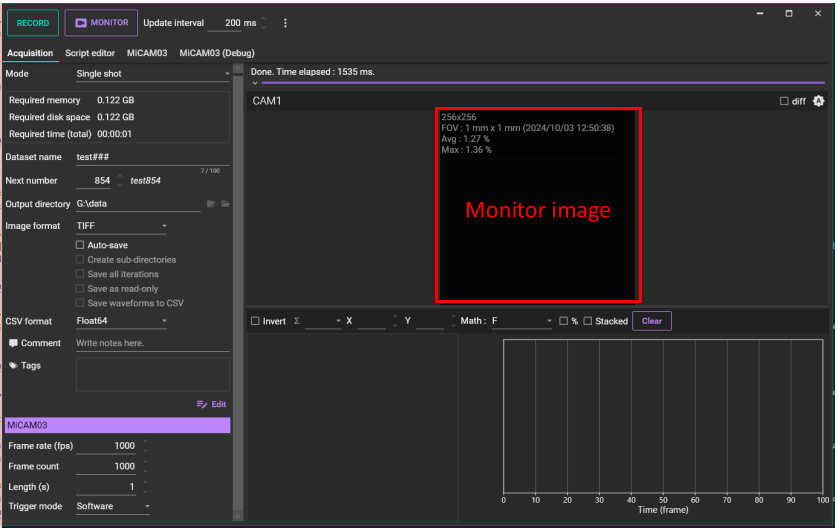
Monitor interval time can be changed with "Update interval".

4-2. Adjusting light intensity of excitation light
After turning off room light and irradiating excitation light, adjust light intensity of excitation light source while checking percentage of Max % displayed on left side of monitor area.
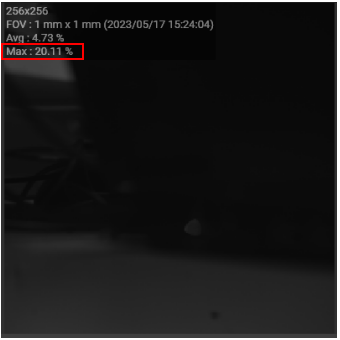
Ideally, camera saturation “Max” should be about 80% in acquisition to detect light attenuation, but it may not reach 80% depending on staining conditions and exposure time.
It is not necessary to be 80%, but higher saturation percentage can expect higher S/N ratio data.
If it is an extremely low value such as about several %, there is a possibility that there may be problems with staining conditions or optical system. But if satisfactory S/N ratio data can be obtained, experiment can be proceed as it is. For acquisition to detect an increase in light intensity, camera saturation may be several percent.
5. Data acquisition
Use the above settings to acquire data.
When the [RECORD] button is clicked, the acquisition starts with the set conditions.
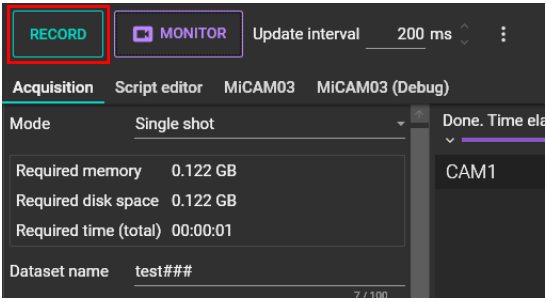
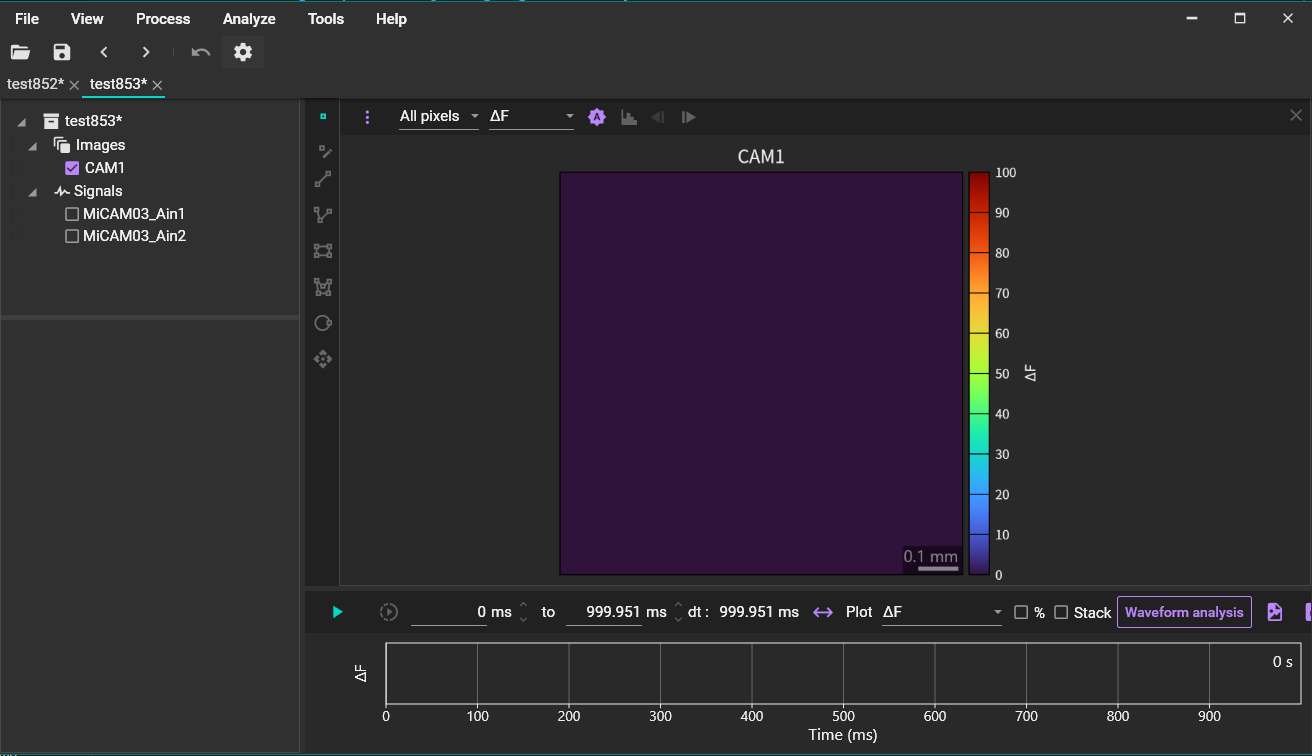
After data acquisition is completed, data will be displayed on the analysis window.
6. Save data
If “Single shot” is selected and "Auto-save" is NOT selected, data is not stored on PC yet (if “Single shot (direct to disk)” is selected, data is saved on PC concurrently with acquisition).
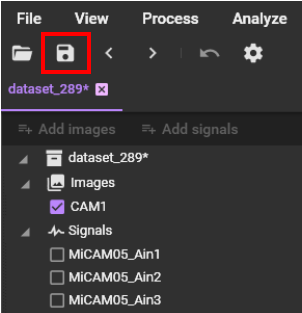
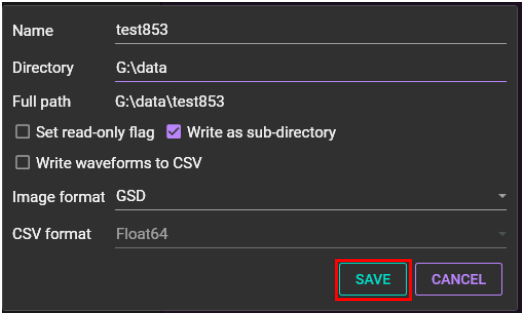
When the [Save] button in the upper left of the analysis window is clicked, the “Save configuration” window will be displayed.
Select the data name, data folder, data format and press the [SAVE] button.
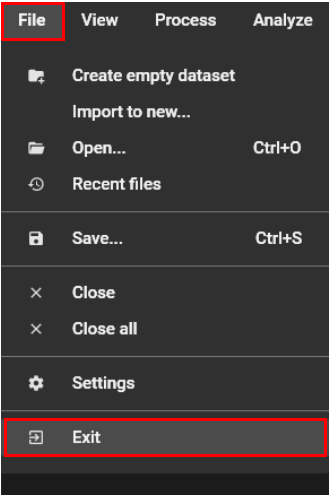
7. Finish data acquisition
When you have finished data acquisition, select [File]-[Exit] to close the software or click [X] at the right upper of the window.
Turn off the power by turning off the power switch on the right side of the MiCAM processor.
